A few days back a young and enthusiastic painter asked me about the watercolor technique I have used for a particular piece he seemed to like. Unfortunately I disappointed him by not answering the question because I myself did not have a clear answer to the question. When I paint I am really not thinking in terms of watercolor techniques. I am thinking in terms of the result that I want to achieve (sometimes my thinking is too abstract to be understood even by me). For example I think “I need a soft edge here”. I do not think “I need to do wet in wet here”. Though wet in wet is one of the watercolor techniques I would employ to get the soft edge I do not necessarily think in terms of the name of the technique. I just use it.
But at the same time talking in terms of techniques help in specific non-abstract verbal and written communication. Especially for beginners who are focused on learning handling of paint and brushes, it is very necessary to speak in terms of techniques. In this series of posts I’ll touch upon Watercolor Techniques I have learnt and used in my works so far. These techniques are going to be from basic to the specialized ones and I am sure it will help everyone learning watercolors. In the first post of this series I’ll discuss the Watercolor Wash Technique.
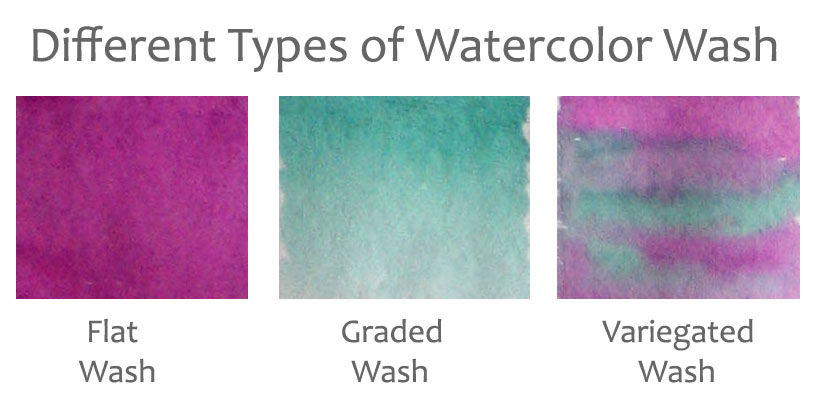
Wash, The fundamental Watercolor Technique
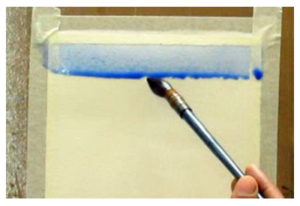
In watercolor it is best when you let gravity do most of the painting for you. When you let the paint flow down the paper using gravitation force of the earth, the color pigments settle in the troughs of the paper surface in a natural way and that creates a luminous look. This is known as ‘washing’ the paper. Quite an intuitive name for a painting technique I would say!
This is how you go about the wash technique.
- Keep your board at an angle to the the ground, so that water can flow downwards slowly.
- Mix pigments with water and load a plump brush that can hold a large amount of water. Mix enough paint so that you don’t run out of it in between.
- Now touching the paper softly with the loaded brush make stroke at the top part of the paper from one end to the other.
- Observe how the paint flows down the paper and forms a ‘bead’ at the bottom of the stroke. Now put a second stroke just below the first stroke touching topmost part of the brush to the bead, so that both the strokes combine become one.
- Do not touch the first stroke. Just use the bead to put the second stroke so that both the strokes combine.
- Again let the bead form at the bottom of the new stroke. If the bead is not forming you are not using enough paint. Supplement the stroke with some more paint so that the bead can form . Now using the bead put the next stroke so that it combines with the stroke above.
- Continue till the end of paper avoiding going over painted areas again.
Voila! your first proper watercolor flat wash is now done.
Here are answers to some FAQ on this watercolor technique.
- What is the angle of the board to the ground? – The angle of the paper to the ground can be as low as 10° as high as 90°. Higher the angle faster the water will flow down the paper and hence you have to work faster to control the flow. For beginners I would suggest keeping the board at approximately 20°-30° to the ground. As you get more and more comfortable with handling watercolor you can vary the angle according to your convenience.
- What is the paint to water ratio for wash technique? – The paint and water mixture should not be thick. It should be of a watery consistency like tea or milk and everything in between. Else the paint will not flow down the paper. For starters make a mix of 20% paint with 80% water. Increase and decrease the amount of water and then observe how the wash comes out.
- How long should I wait for the bead to form? – Don’t wait for ever to let the bead form. If you wait too long then a hard line will form at the bottom of your stroke, because the paint will start to dry. If your paper is not of artist quality then the hard line forms much faster.
- What brush should I use? – You can use a round brush or a flat brush for the wash. Make sure it can hold a lot of water. A mop brush works really well for wash as it holds the maximum amount of water.
- What is the size of the brush I should use? – Size of the brush really depends on the size of the area you are going to wash. A brush should hold enough water to make at least a couple of undisturbed stroke from one side of the paper to the other.
Graded Wash
The outcome of a graded wash is similar to flat wash except that the color intensity slowly increases of decreases from top to bottom of the paper; The kind of wash that you’ll see in the painting of a sky or vast green fields. To make a graded wash follow the same method as a flat wash. But instead of using the same mixture of paint every time, use a more diluted paint mixture for every new stroke. Keep adding water to the paint mixture as you go down the paper putting strokes.
Some Tips on Graded Wash Watercolor Technique
- When you are creating the wash the paint is still wet and the gradation of the color will be difficult to see from one stroke to the other. Many beginners tend to put more water to the subsequent strokes than what is necessary because of this. And this creates a hard transition of tone. So do not worry too much while creating the wash. Just keep adding consistent amount of water from one stroke to the next and you’ll have your beautiful graded wash in the end.
- Preferably do not use the brush with which you are painting to get more water into the mix. Use another brush or a water dropper to get more water into the mix.
- Generally it is easier to go dark to light in this watercolor technique. In other words it is easier to make the paint consistency thinner as we go on creating the wash. You can also do the opposite. That is keep adding more pigments to the mix as you go on putting strokes. But the watery paint from the top stroke tends to push out pigments of the new stroke, which is thicker. So this needs some mastery to be done well and also needs to be done at a lower slope of the board. One hack to go light to dark is to paint dark to light by rotating the paper by 180°.
Variegated Wash
This type of wash is used to gently merge colors into each other to create a slow color transition effect. You’ll need minimum 2 colors for this watercolor technique.
- Lay down a wash of one color quickly on paper. The whole paper need not be filled with it.
- Before it dries introduce wash of second color into it gently. The second color should not be applied evenly. You can leave some areas of the first color as it is and you can paint over unpainted areas with the second color. In rest of the places the two colors will merge into each other creating a third color.
- Continue the wash down the paper by using both the colors.
- All the time while you paint make sure that you are letting the paint flow on the paper due to gravity. Let it dry and see how magically the colors have blended into each other.
A wash technique in the end remains a watercolor technique whereby you use gravity to pull the paint down and let the pigments settle on the paper naturally. And this is what gives watercolor painting its luminosity. If the paint is not allowed to flow naturally, it becomes muddy and looks really bad. So irrespective of the size and shape of the area that you paint in watercolor, if you want a transparent look you have to use wash technique. Be conscious of this fact while painting and get into the habit of using this watercolor technique. Soon you’ll notice the difference in your work.